I wish there was a way to go POOF and the whole kitchen would be set up, but there is not. However, as someone who has rezzed many kitchens in many homes before, I have a few tips on how to rez the entire coalesced kitchen a little more easily.
BEFORE REZZING KITCHEN: For your convenience, a copy of the kitchen, island, oven, refrigerator and many accessories are coalesced (but not linked) into one object called "KITCHEN GROUP- (name of kitchen) (Coalesced") -- it has about 200 prims. This will save you time but is easier if you already have it rotated before you place in the house:
1. It is best to find an empty space outside the house to first rez the group, in case you must rotate it. It is much easier to rotate if you can view the group from above. If you rez the group and find you will not need to rotate it, you can take it back into inventory.
2. To help you align the kitchen at right angles to the grid, put down the Black and White Checkered Floor first.
3. Be in EDIT before rezzing your kitchen group. (R Click on any object and choose EDIT.) Then when you rez the group the edit arrows will jump to the group and you will be able to move everything around as one object.
4. Use the checkered floor to help you rotate and line up the group as straight as possible. Then get out of edit and check the kitchen rotation numbers found at the bottom of the Object tab in Edit. If you do not know how to check for alignment, read HERE.
5. If you need to adjust rotation, re-select everything (by box selecting) and do so, then check alignment again.
When rotation is correct, take the group back into inventory. Then re- rez in your kitchen, where it will already have the correct rotation, being careful to stay in Edit so you can move the whole group at once.
All done!
.jpg)
.jpg)
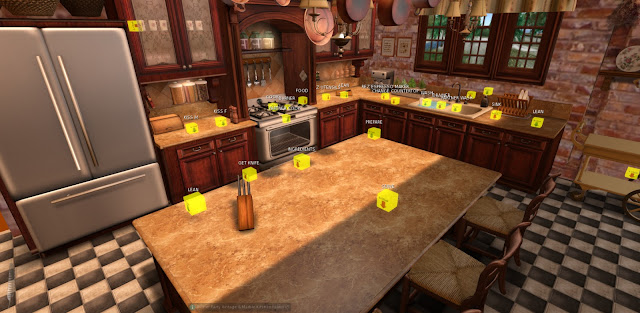
In newest update: When first rezzed you will see many small cubes with arrows and labels showing all the different places to click to rez things, turn things on and off, and start animations. These are just for your convenience and can be deleted when you like. Also rezzed is a menu board that links to this blog.
.jpg)
If you prefer to individually place items, they, along with MANY other things, are in the kitchen box, the Accessories box, or the Appliances box.
You may switch out your refrigerator and oven to either steel or black versions -- they are not linked to the rest of the kitchen. These are in the Appliances box.
You may also switch out countertops by touching the front rounded edge of the countertop, which will give you a menu to choose from. (This option does not apply to the Ebony and Cream.)
You may also switch out countertops by touching the front rounded edge of the countertop, which will give you a menu to choose from. (This option does not apply to the Ebony and Cream.)
REZZING OBJECTS FROM A MENU
IMPORTANT: PRIMING
When you first rez something from any part of your kitchen, manually delete that first item that rezzes. After that you can use the menu to clear and rez all items. Fast method: first rez one item from each place that rezzes anything, then shift-select each one and delete them all at once.
WHAT REZZES THINGS
- Black and steel ovens - mesh L CLICK KNOBS TO REZ FOOD; SIT TO USE ANIMATIONS (ADJUSTABLE)
- Steel and Ivory Sinks REZ FROM COUNTER TO RIGHT OF SINK; DISH DRAINER REZZES FROM SINK; WATER REZZES FROM DISH DRAINER; TOUCH PLATE TO GET PLATE AND SPONGE; SIT ON WATER TO BEGIN WASHING.
- Cabinets rez food items from the bottom and hanging mugs or wine glasses from the shelves above. Touch food to eat.
- Fireplace - rezzes logs from menu
- Kitchen Knife Holder that rezzes knife for chopping - TOUCH TOP LEFT KNIFE TO ATTACH
- Toaster (rezzes toast, bagels, waffles) ALSO REZZES FROM BAR, CART, CABINETS
- Cappuccino / Espresso Maker (rezzes cups that give cappucino, espresso, cafe au lait) REZZES FROM COUNTER TO THE LEFT OF THE SINK
- Canister of utensils that rez spatula, whisk, spoon for cooking REZ FROM COUNTER TO RIGHT OF OVEN
- Island rezzes food for guests from the side near stools, and food to prepare from the center of the opposite side.